
I take tons of pictures everyday because I am fascinated by all that is beautiful in this world. Having a digital camera, where you can pick and choose your pictures before printing them is a real gift compared to old school, when you never really knew if you got the shot until you developed your film. Wildlife and nature are my favorite subjects, but you can use these tips for any photography. I think anybody can take great pictures. It just takes a little time, knowledge, and patience to get that WOW shot!
1. Do your research! You are not going to get a good pic if you don’t know where animals breed, feed, and water. Different breeds feed differently, and that means that you will have a different subject everywhere you travel. Bodies of water are the best locales for almost any nature shot. At some point during each day, animals have to drink to survive. Do your research on line, network with other folks who are nature watchers to see if they know interesting places. Best of all, talk with the locals. People are always happy to show off their hometowns, and you will get a lot more direct information with this source. First time I visited Lake Fork near Quitman, I talked to the guys in the bait shops about the best places to watch the bald eagles that were wintering there. It was local people who directed us to a little cove where the eagles were nesting. We got to see adults, their nests, immature eagles, and even watch an immature learn to fish. Be nice, talk to the locals, and you will have great success in finding a good shot.
2. Once you’ve found your spot, be respectful. Remember these are wild animals, you are visiting their home. Treat them as respectfully as you would any guest in your own home Do not disturb breeding animals. It’s not only damaging to the environment, but could be dangerous for you. Mother animals, no matter the breed, are always protective of their young. Find a quiet spot, at a good but not too far distance. If necessary, use binoculars to locate the animals, and move in very slowly, a little closer each visit. It might take 2-3 visits, or it could 20 visits to be accepted by the wildlife. But, once you become a regular visitor, you’ll find that after your initial arrival, if you sit still and are quiet, the animals will come back out and continue their business of living. This opens up the opportunity for you to get some great shots.
3. Use the settings on your digital camera! The new cameras available today, even the simplest point and shoots, have nice zooms and the capability of getting great continuous action shots. If you’re using a long zoom, stabilize the camera before you shoot. Use a rock, a tree, your car, or sit down and use your knee. The longer the zoom, the more the possibility arises that your picture is going to end up blurry if you don’t stabilize the camera. If you want to go to the expense, you can set up a tripod, but I’ve found it’s much easier to use what’s around you. The less you have to carry, the better. For action shots, use the sports/athletics setting on your camera. This will enable you to take a continuous sequence of shots as an animal is moving. You can pick and choose later which shots you want to keep.
4. Pay attention to light! We all have those pictures of humans where the sun is bright behind the group in the picture, and people’s faces disappear. The same principle applies when shooting wildlife. Take a picture of a bird with the sun behind it and all you’re going to get is a silhouette. Always position yourself with the sun behind you. The light behind you will highlight colors and details of the animal. A lot of digital cameras have a lightness setting where you can make your picture look darker and the colors richer. Don’t use it!! Try to keep that setting on zero as much as possible. A lighter exposure will always make a better print. I don’t know the reasoning behind it, but with digitals, it seems that the prints are always darker than what we see on the view screen. Use only natural light when shooting wildlife; a flash will startle animals, and all you’ll get in your picture glowing eyes and a silhouette.
5. Use the golden mean of composition! Don’t center all your shots. Every picture (or any artwork) has what is termed "negative" and "positive" space. Positive space is filled with the focus of your picture. Negative space is the background and foreground around it.
Here’s an example for comparison:
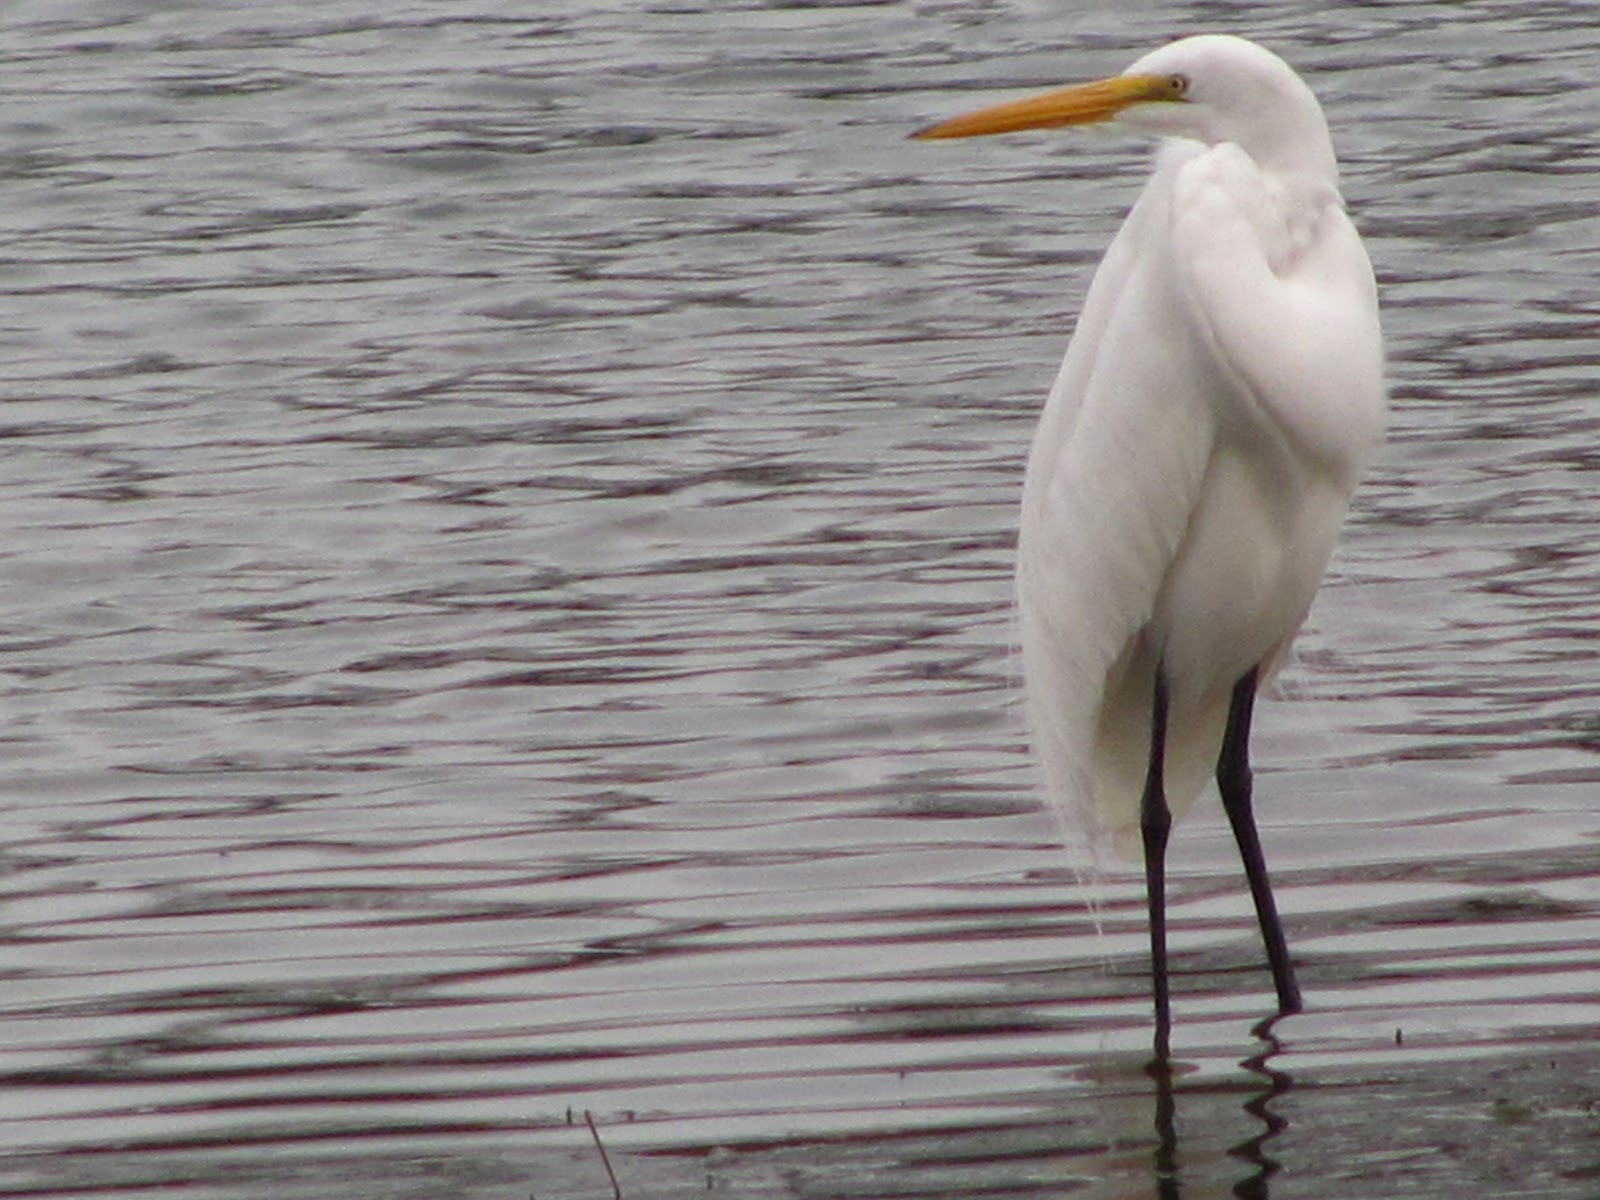

On the left, the egret is positive space, and the water around it negative space.
On the right, the foliage is negtative space and the egret positive space.
The shot on the right is not a bad picture, but even though the light is better, this picture is not as interesting as the first picture because the egret is dead center. It is not intriguing to the human brain to see a picture centered this way. Use the negative space in your pictures to lead your viewer’s eye to your focal point.
6. Don’t get stuck in horizontal hold!! Turning the camera lengthwise gives a longer, taller look to tall animals, trees, and people. Most digitals hold the picture sideways in memory, but you can always rotate the picture once you download it.
7. Mornings and evenings are the best times to capture wildlife pictures. In the morning, nocturnal animals are often still around finishing off their nights, and morning animals are waking up thirsty and hungry. In the evening, the situation is reversed. Either time will show you a good mix of both nocturnal and daylight creatures. Some animals will visit a location weekly, some daily, some only occasionally. Be patient, visit the same place frequently, and you will be amazed at the variety you see.
8. Pay attention to weather forecasts! Nobody wants to birdwatch in the rain, but if you hear news that a line of thunderstorms or a cold front is moving in, try to get to your spot the day before. Animals seem to have a sixth sense about weather and are always more active the day before a significant change in weather. You may see more animals of the same variety, or brand new visitors who sense the weather coming and stopped by for a quick snack or drink.
9. Use the zoom on your camera, but carry binoculars with you to scout out wildlife before you move closer. If you don’t have binoculars, you can use the zoom on your camera to get a feel for a good position. Finding wildlife from a distance and approaching slowly will help you be more successful and less intrusive to their world.
10. Pay attention to color! Each primary color (red, blue, yellow) has a complementary color on a color wheel. Complementary colors make each other stand out brighter, giving your pictures more vibrant dynamics. Basic complementaries are red/green, blue/orange, and yellow/purple. Putting these colors next to each other in a picture causes the rods and cones in our eyes to vibrate more strongly, creating pictures with stronger impact.
Most important, have a good time! You’re there to appreciate the beauty of the world around you. Pay attention to where you walk, to the plants that grow close to the ground, to the colors of the trees around you, to the sounds the animals make, to the bugs flying around you, to the lap of water against the bank. God put this beauty on this our planet for us to appreciate; enjoying it fulfills His plan!
I hope these tips help you out with all your photography. Paying attention to light, knowing the principles of negative/positive space, composition using the gold mean, and remembering your complementary colors will help you with any picture you take. Now, go out there and have some fun!
Love to all I love who love me back,
allison
Awesome tips! I will have to try these out sometime!
ReplyDelete